Getting Started with GPS-Trace Platform | GPS-Trace

Getting Started with GPS-Trace Platform

This guide will walk you through the steps to start using our platform.
So let's get started!

Watch this quick video to discover the first steps and key benefits of our system, helping you get started in no time

1

Register in Admin Panel

The admin panel is your central management hub for creating and managing accounts across all GPS-Trace solutions.

Registration is simple:

  1. Visit the registration page.
  2. Click on the Sign up button.
  3. Fill in the required fields.
  4. Confirm your email.

That's it! You now have access to the platform.

What the admin panel of the platform gives you:

  • Check Icon Create accounts and units in any solution on the GPS-Trace platform.
  • Check Icon Configure plans, thereby managing the application functionality.
  • Check Icon Customize branding with your logo and colors.
  • Check Icon Get help with built-in 24/7 AI assistant, documentation, and FAQ.
  • Check Icon Use Platform API for advanced integrations.
Check Icon

For Service Providers

  • Check Icon Payment collection tools (Stripe/PayPal).
  • Check Icon Remote technical support capabilities.
  • Check Icon Autoblocking of users for non-payment.
  • Check Icon Dealer map listing and profile display in customer application.
2

Activate 30-Day Trial

After registration, activate your Trial period directly in the Admin Panel to explore the full functionality of the platform at no cost.

Important Note

What you can test during Trial:

  • Check Icon 2 accounts with access to Forguard application (up to 30 units in each)
  • Check Icon 2 accounts with access to Tags solution (up to 10 assets in each)
  • Check Icon Configuring plans with different features and limits
  • Check Icon Core features unlocked - multi-user access, custom branding etc.
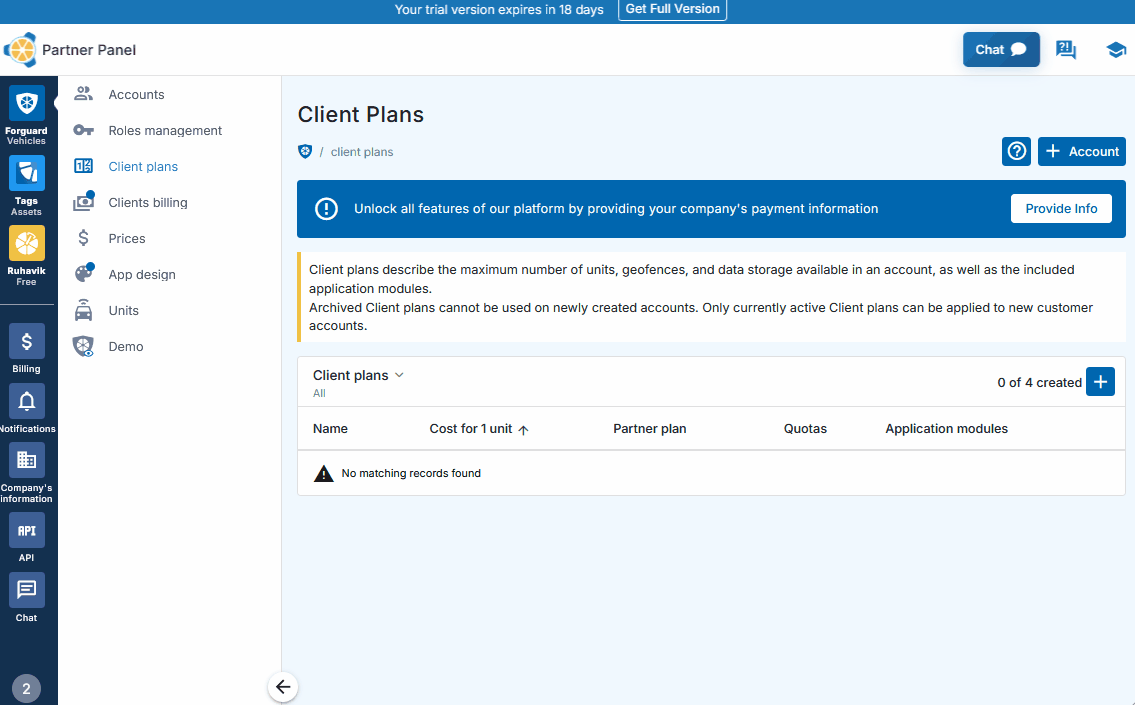
3

Create Plan

GPS-Trace Platform connects you to two tracking solutions: Forguard and Tags.

Before creating an account with access to Forguard or Tags, you need to set up a Client Plan - a configuration that defines which features will be available and what limits will apply.

Client Plans are built upon Partner Plans provided by GPS-Trace. You can view all available Partner Plans and their pricing here.

Creating Your First Plan

  1. Navigate to the Forguard or Tags section in admin panel
  2. Go to the Client Plans tab
  3. Click the "+" button to create a new plan
  4. Set maximum limits (units, geofences, history period)
  5. Select features to enable
  6. Save your plan
Create Account
Check Icon

For Service Providers

Client Plans allow service providers to create different service packages with varying features and price points. Dealers can offer tiered options (Basic, Professional, Enterprise and so on) to different customer segments and set their own pricing.
The profit margin is the difference between what dealers charge their clients and what they pay to GPS-Trace.
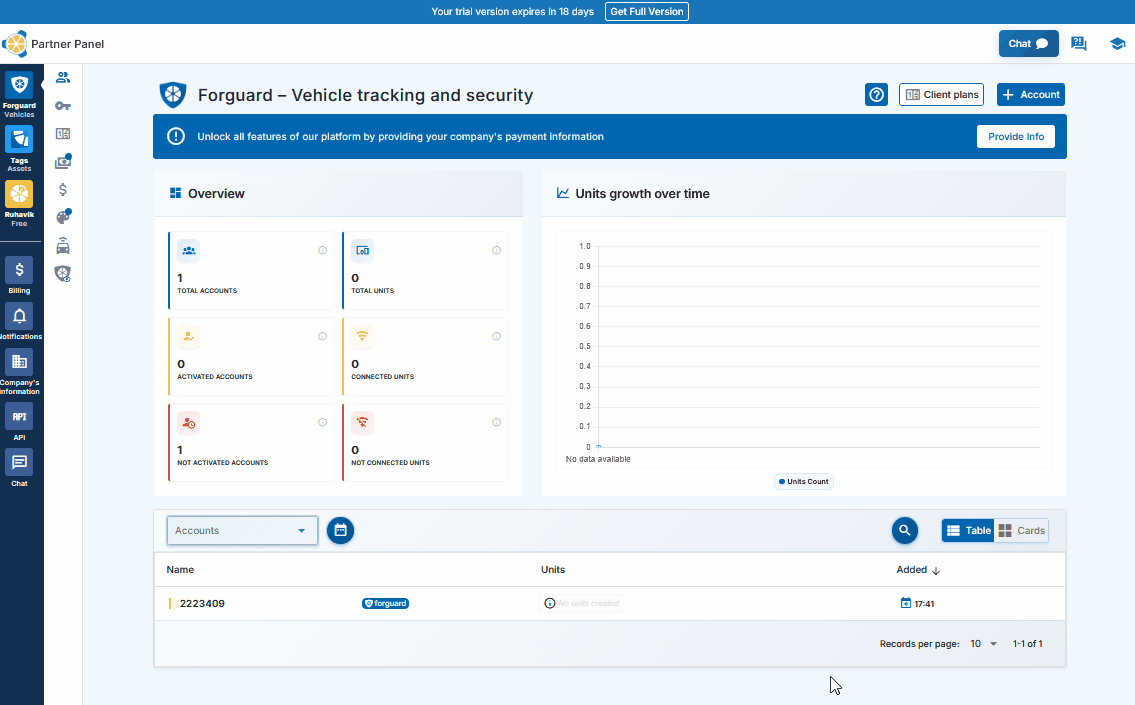
4

Create Account

Now that you have a Client Plan ready, it's time to create an account that will provide access to the application (Forguard or Tags).

Creating an Account

  1. Go to the Forguard or Tags tab in admin panel
  2. Click the blue "+" button in the Accounts section
  3. Select the previously created Client Plan from the dropdown menu.
  4. Click on the 'Save' button.
Create Account

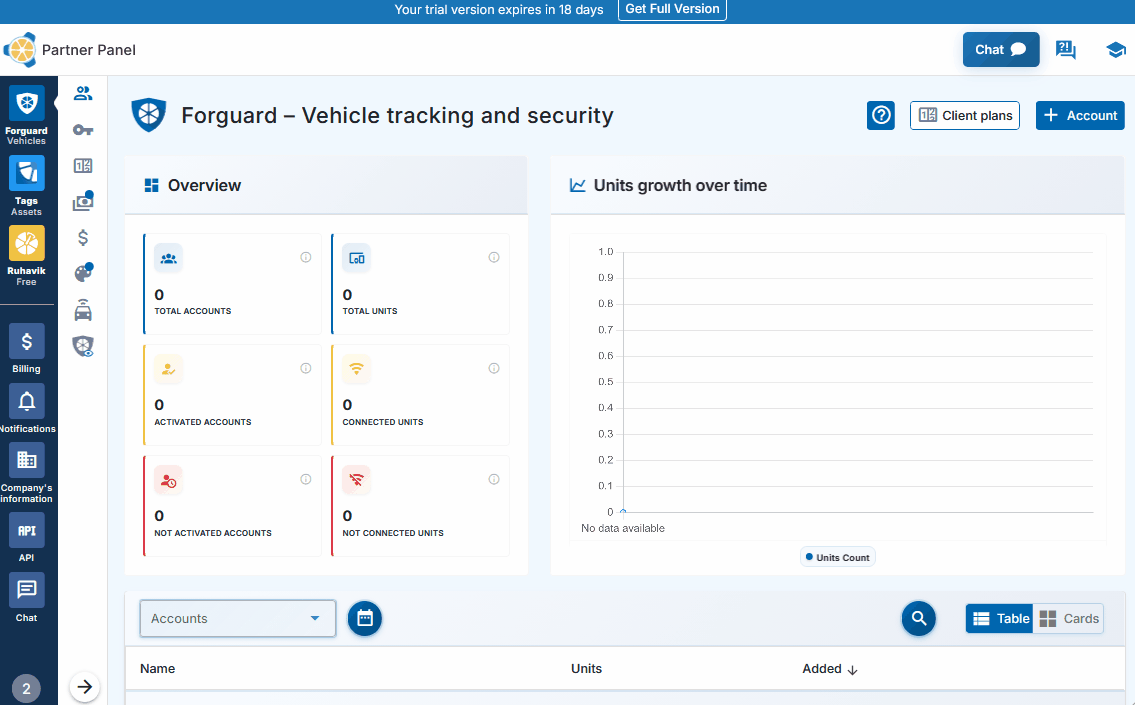
Done! The account is created instantly.

To start using the application, activate the account by setting login credentials via the activation link or QR code. This can be done by yourself (if using for your own business) or shared with a client for their activation.

Important Note

Multi-User Access and Permissions

The platform supports multi-user access to applications with permission management. Additional users can be created directly in the Admin Panel with customized access levels.

Two tools help organize team access:
Roles - define which features users can access (notifications, reports, geofences, commands) and what actions they can perform (view, create, edit, delete)
Access Lists - control which specific devices (units) each user can see, useful for separating access by teams, regions, or vehicle types.
5

Create Unit

Units are the physical GPS trackers or gateways that collect and transmit data to the platform. Without units, the account won't have any devices to track. Creating units connects your hardware to the system.

Creating Units in Forguard

  1. Select the account you want to add a unit to
  2. Click the "+" icon in the Units section
  3. Select the model of your GPS device (tracker) from the list.
  4. Enter device details (IMEI, password if required)
  5. Click on the 'Save' button

If your device is properly configured and transmitting data, you'll see it online within minutes.

Create Unit
Important Note

Gateways and Assets in Tags

Tags works with two types of entities:

  • Check Icon Gateways - GPS trackers that detect BLE sensors and transmit data
  • Check Icon Assets - Items being tracked (BLE tags, wired sensors, or parameters from gateways)

Creating gateways follows the same process as creating Forguard units (steps above).

Creating Assets in Tags

  1. log into the Tags
  2. Navigate to a Gateway's page to see detected BLE devices
  3. Click "+" next to unlinked devices to create assets
  4. Or create assets from gateway parameters via the Telemetry data tab
6

Sign Offer Agreement

When you are ready to continue using the platform beyond the trial period, sign the Offer Agreement.

  1. Go to Company's Payment Information section
  2. Fill in the required details and upload verification documents (company registration certificate or business entity registration document)
  3. Submit for verification
  4. Once approved, read and accept the Offer Agreement

That's it! You're now a fully authorized user with complete access to the platform.

Check Icon

For Service Providers

After signing the Offer Agreement and completing verification, service providers unlock advanced business tools:

  • Check Icon Client billing - PayPal and Stripe integration with payment link generation and automated customer invoicing
  • Check Icon Automatic account blocking - ability to set a blocking date for clients
  • Check Icon Advanced custom branding - own domain (CNAME) and application name
  • Check Icon Draft units - pre-creation of units without billing charges until assignment to client accounts

FAQ

To track location, you need:

  1. A tracker integrated on our platform with a SIM card.
  2. One of the GPS-Trace solutions: Ruhavik, Petovik, or Forguard.

You can either:

  • Use the solution independently by purchasing and setting up the tracker yourself,
    or
  • Contact a dealer for a complete solution, which includes the tracker, setup and installation, SIM card, and other related services.

You can find a dealer near you using the Dealer Map.

More details about getting started.
List of integrated integrated devices.
Please note that this list does not include about 500+ device types from the legacy category.
The full list of integrated devices can be seen in the device type line when creating a unit in the application.


Blog articles:
Discover the Power of GPS Tracking with GPS-Trace: Your Ultimate Guide

In order to see your tracker on the map, you need to:
1. Create an account and log into it.
2. Create a unit.
3. Set up a tracker:
- direct your device to the server and port specified on the Hardware tab in the Unit settings;
- set time zone UTC 0;
- configure the APN (depending on the provider of the SIM cards, this may be just the APN or also the APN username and password).

As soon as the tracker starts sending data to our system, you will see your unit on the map.

More details about registration.

Most trackers are configured using SMS commands that are sent to the SIM card used in the tracker.
The list of SMS commands can be found in the instructions for the tracker. Some devices are configured using special programs - configurators - via a PC.

Instructions for the most popular trackers.

The tracking of one unit (car, motorcycle, bicycle, pet, etc.) is free.
With a paid subscription, up to 30 units can be created in one account.

What you can do: 
1. Try to remember if your tracker is used in an account created with another email. To restore access to another account, if you remember this email, you can use the "Forgot password?"
You can also write to us at support@gps-trace.com, specifying the ID/IMEI and type (model) of the tracker, and we will be able to check if the tracker is used in another account.

2. If the tracker is already registered in another account, and you cannot restore access to it, write to us at support@gps-trace.com with the ID / IMEI, type (model) of the tracker and attach a photo of the tracker, we will describe the next steps to solve the problem.


1. To select the most suitable tracker, you can contact one of our dealers. You can find a dealer on the Dealer map.
2. Our website has a list of devices integrated into our platform. To select a suitable tracker, you can use the appropriate hashtags: #vehicle #mobile #common #pet. And also see which trackers are the most popular on our platform in general or in your region.

List of integrated devices.
Please note that this list does not include about 500+ device types from the legacy category.
The full list of integrated devices can be seen in the device type line when creating a unit in the application.

Many trackers have different names but work on the same protocols. Accordingly, when connecting a device that is not in the list of integrated ones, you can try to select another type of device from the integrated ones. In this case, we recommend focusing on the protocol used by the tracker as well as SMS commands that your tracker understands and responds to.

If you are unable to select the type of device yourself, please contact us at support@gps-trace.com and write us your login/email, type, model, tracker manufacturer, and attach a photo of the tracker, instructions for it and a screenshot of the device configuration (SMS commands and device's answers), we will try to help you.

Blog articles:
Connecting Clones and Non-Integrated GPS Devices: Practical Tips 

You can turn a mobile phone into a tracker using specialized applications.
We suggest using WiaTag or Traccar Client applications for this purpose.

Blog articles:
1. Using a Mobile Phone for Tracking with Ruhavik 
2. How to use your phone as a tracker. Ruhavik & Traccar Client 
3. How to use your phone as a tracker. Ruhavik & WiaTag

The tracker may not work for a variety of reasons.

Most frequent:

1) The problem is on the side of the mobile operator (SIM card).
2) Lack of balance or traffic limit on the SIM card.
3) The device is in a shielded room and therefore there is no communication.
4) Incorrect or lost tracker settings (for example, the tracker has gone into sleep mode or is configured to send messages infrequently).
5) The tracker does not have enough charge and it stores data in a black box until it is connected to a power source.

In this situation, we recommend:

1. Check the traffic limit and the balance of the SIM card used in the tracker. It happens that there is money on the SIM card, for example, but the entire traffic limit has already been used up.

2. Check your tracker settings and message frequency. Sometimes the tracker goes into sleep mode and, accordingly, does not send data about the tracker's location.

3. Check the correct installation of the tracker. Perhaps it is installed in a place (in a shielded box) that does not allow it to see the satellites well.

4. Make sure that the tracker is not located in a shielded area (covered parking, tunnel, building, etc.), which also makes it difficult for the tracker to receive coordinates from the satellite.

Blog articles:
Why GPS trackers may not work

The application has a Sharing option, which is designed to share the location of your unit with others using a special link.
Using the Sharing option, you can create such links for each unit for up to 1 year. It is also possible to create a link to access multiple units.
Sharing option is only available with a paid subscription.

More details about Sharing.

Blog articles:
1. Use the Sharing option and stay in touch!
2. Updates in Ruhavik: Engine Hour Counters, Multiple Unit Sharing, and Track Tail
3. Petovik's Update: Introducing Sharing Option

To recover your password, you need to do the following:
1. When you enter the application, use the ""Forgot password?"" function, after which an email with a link to reset your password will be sent to the email associated with your account.
2. Follow the link in the email and create a new password.
3. Return to the login page and enter your username and new password.

To change your email address, you can do the following:
1. Go to the user settings by clicking on the three vertical dots in the upper right corner.
2. In the email line, click the pencil icon, a window for changing the address will open.
3. Enter your new email address and current password.
4. In the email that will be sent to your new email address, click on the link to confirm the change of email address.

There are two ways to change your password:
1) Function "Forgot password?"
1. On the account login page, click "Forgot password?", after which an email with a link to reset your password will be sent to the email associated with your account.
2. Follow the link in the email and create a new password.
3. Return to the login page and enter your username and new password.

2) Changing the password in the user settings:
1. Go to the user settings by clicking on the three vertical dots in the upper right corner.
2. In the password bar, click the pencil icon; a window for changing the password will open.
3. Enter the current password as well as the new password and repeat it.

More details about user settings.

In case you do not have access to your account and the email address to which the account is registered, write to us at support@gps-trace.com with the IMEI / ID, type (model) and manufacturer of your tracker, and we will describe the necessary steps to solve the problem.

In case your tracker was offline for some reason, it could accumulate GPS data in memory and, after reconnecting, start uploading this data into our system.

Thus, the time difference is formed:
1. time when the tracker received data from satellites;
2. the time when the data was sent to the system by the tracker.

Thus, so-called messages from the past come into the system.
In the Toolbox, such messages are grayed out. Toolbox is only available with a paid subscription.

More details about Toolbox. 

The storage is designed to store data that comes from the tracker into our system.

After the entire amount of storage provided by your tariff plan is completely filled, new data from the tracker will overwrite the oldest ones. The application itself will continue to work as usual and will display the current location of the tracker.

The maximum storage period for data transmitted from the tracker is 365 days.

In the Statistics Paid Subscription tab, the following information is available to users:
- summary mileage information;
- charts by parameters sent by the tracker;
- summary engine hours information (if the tracker sends the engine.ignition.status parameter and the user has a premium subscription);
- export events.

Statistics tab is only available with a paid subscription.
More details about statistics. 

Also, the application collects data on the timeline (all information about the events of the unit: trips, parking, speeding, alarm messages, battery charge, towing, etc.) and on the history of trips (information about the track for a certain day or period of time).
Timeline tab is only available with a paid subscription.

Blog articles:
1. Mileage and Engine Hours Counters in Ruhavik 
2. Exporting Data from Ruhavik: Detailed Guide

You can export data for the following sections:

Paid Subscription available with a paid subscription.

Blog articles:
1. Exporting Data from Ruhavik: Detailed Guide 
2. Ruhavik Updates: Nautical Measure, Data Export, and Unit Grouping on the Map

The application offers Simple, Customizable and Parameter notifications.

The simple Paid Subscription ones are notifications:
- by geofences;
- by alarm messages from your device;
- on trips;
- for towing.

The customizable Paid Subscription ones are notifications:
- about exceeding the specified speed by the unit;
- about the battery charge;
- the need to charge the device;
- about the absence of messages from the device.

Parameter Paid Subscription notifications allows you to receive notifications related to the parameters you choose, which are contained in the messages sent by the tracker.
You can receive notifications about fuel, battery, door open/close, alarm activation, and much more.

Paid Subscription available with a paid subscription.

More details about notification types.

Blog articles:
Notifications: Track your vehicle with ease

Notifications can be sent in the following ways:
- in the form of push notifications;
If you have a paid subscription, the following methods are also available:
- by email to the email associated with your account;
- to the Telegram messenger;
- in the form of webhooks to your server.

More details about setting up notifications in Telegram.

Our application is free to track 1 unit.
The free package also includes the use of 1 geofence and 1 MB of storage.

With a paid subscription, users can get additional benefits, the volume and level of which depend on the chosen subscription plan:

  • Up to 30 units per account
  • More data storage (up to 100 MB)
  • Google Maps
  • Advanced notifications and additional delivery methods (email, Telegram, and webhooks)
  • Up to 15 geofences of various shapes, including polygons
  • Unit Tools: Toolbox and SetBox – allow you to remotely configure the operation of GPS devices, view messages from the tracker, connection logs, errors, unit edits, and all raw traffic.
  • Commands Panel – GPRS commands for greater control over your devices (available from the Premium Basic plan and higher).
  • Location Sharing – the ability to share the location of your vehicles with other people using a special link.
  • Timeline – track all unit events for the selected day in chronological order.
  • Statistics – view unit statistics, analyze data with charts, and export summary reports in various formats.
  • Maintenance – monitor the condition of your vehicle and manage its maintenance using mileage and engine hours counters.
  • And more.

You can subscribe via Google Play, App Store, or by paying via PayPal or Stripe directly on the website.
The subscription cost can be viewed in the Subscriptions section of the application or by clicking the Subscribe button in the upper left corner of our website.

More details on our pricing.

We really appreciate the feedback and ratings of our users because they help us develop and grow.


If you have the opportunity and a couple of minutes of time, we will be very grateful if you can rate our application:
- on Google Play;
- on App Store.

We communicate with our users via email.

- If you have any questions about working with Ruhavik, Petovik or Forguard solutions, please contact us at support@gps-trace.com.
You can also post your question on our forum.

- If you want to become a partner and use our tools to build a monitoring business, write to us at business@gurtam.space.
More details our business solutions.